Monday, February 28, 2011

Tandem Bike Wedding: More Decor Ideas

Martha stewart has so many cute wedding ideas...   ah, to have a staff to create and design these beautiful things - that's my dream.  Here are some things we found on her site and made for the wedding:


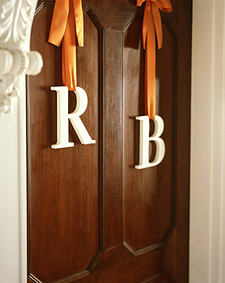
I made two sets of letters - one with handmade fabric roses and another with small red Styrofoam berries (found in the floral section at Hobby Lobby).

So, the puzzle was what to make the letter forms from, without spending a ton of money.  Yes, it's easy to buy big letters at Michaels or Hobby Lobby... but four of them would have cost close to $50.  I bought a 4x8 sheet of 1" rigid foam insulation and cut out the letters.  The sheet was $13 and I think I've got enough for a lifetime of letters - it's hovering in the garage right now - and I must have 75% of the sheet remaining, even after using the same sheet to cut the circles for the cupcake stand.  Cutting the letters was a mess - do it outside.  I found a font I liked online and hand drew letters about 15" tall onto the foam.  I used a utility knife to cut them out - but be careful.  Then I used hot glue to add the fabric roses.  For the berries, I spray painted the letters red first, then used modge podge and elmer's glue to add the berries (I'm still not sure which worked better) - that was a messy project too!

The photographer has the best photos of these - here they are:


Saturday, February 26, 2011

Tandem Bike Wedding: Wedding Cake & Cake Topper

The budget for the wedding was small... really small.  So after pricing a few wedding cakes, realized we were going to be using a cupcake stand.  Joy (who I previously mentioned was helping me with some party ideas) thought it would be cute to have a cupcake stand made from bike wheels.  I loved the idea but pondered how to implement that one for quite a long time (went so far as to buy a few sets of bike wheels to try to use) - and eventually created a cupcake stand from rigid foam insulation pieces (cut in large circles, 12", 15", 20" and 24"), a 24" threaded rod and nuts (to hold the pieces together vertically), and pipe wrap around the circles to look like tires.  I used plastic cups, with holes drilled through for the threaded rod to separate each level.  Those were wrapped in foil to mimic real bike parts.  I used a silver sharpie to hand draw spokes on the tops and bottoms of each of the levels also.

Here it is.  Total cost was probably about $8.


I saw the cutest tandem bike cake toppers on Etsy...   but as you might have gathered, I'm too frugal for my own good.
I even found a great tutorial on bending wire to form a bike here:  http://www.instructables.com/id/Bike-out-of-wire/

I made one bike following the technique from the instructables site... and had even thought I'd do a second one, adding the tandem.


But in the end, I just wasn't sure that was the ideal topper.  Also, I really wanted to represent the kids in the wedding too - so decided to create custom dolls for the topper.

Again I researched Etsy - aren't these cute!

I bought some small wood dolls at Michaels (in two different sizes) and set out to paint each of them as a likeness of the family:


Here they are on the finished cake.  (you can see in this photo above that my pipe wrap is coming loose - that drove me nuts - I must have re-taped it 6-7 times in the week prior to the wedding).

Tandem Bike Wedding: Where to Start

After discovering a theme, I wasn't quite sure where to start - so thank god for the web.  I really don't know what I did with all my free time before I started browsing the web in 1995.  There are quite a few sites with ideas on tandem bike weddings (cute cake toppers, invites, decorations) that I found over the months of planning while googling "tandem bike", "bicycle wedding", etc.  After some time browsing and a little help from a party planning goddess friend (thanks Joy!), I decided to order a custom stamp....

Custom Stamp:  the custom stamp with a tandem bike, our names and the wedding date, really helped pull together all the decorations.  We used the stamp on a number of different things - the programs (the smaller inner circle with just the bike was cut out and put on top of another small circle, caramel corn cups, advice cards and more.  I even used the stamp proof to make a pillow with an iron on transfer.


Tandem Bike Wedding Projects: Photo Booth

I love the idea and imagery of a tandem bike.  Add to that our shared passion of biking - and a tandem bike theme seemed like the perfect concept for our recent wedding.

Photo booth:  Having fallen in love with the idea of a photo booth, I looked all over the find the best inexpensive solution for our reception.  Although I bought a remote, external flash and remote flash trigger, we ended up going with a software program that uses a webcam called Sparkbooth.

Sparkbooth Software:  The software allows you to insert your own logo and create various templates for how to display the pictures.  It's a great solution - and only set us back $59.  We bought a webcam for my laptop for another $35 at amazon.com.  After creating and buying some fun props, we set up a color printer, bought stacks of 4x6 photo paper at Costco and we were ready to go.  We offered a prize to our favorite photo and you can see it below - very clever use of Twizzlers from the Candy Bar to augment our props.

One thing that did cause some trouble was the color and lighting of our photo booth room.  We have green walls in that room and not much natural light... so with another $50 investment, we bought photo studio lights from Cowboy Studio on amazon.com and had a great set up.  We used a king size ivory sheet taped to the crown molding to provide a backdrop.

Photo Props:

  • tandem bike
  • feather boas
  • homemade mustaches and lips
  • goofy glasses
  • cowboy hat
  • mardi gras mask


Renovatory

I've always had a passion for renovating houses, although I didn't always consider myself a "creative" person.  I bought and renovated my first house in 1997 and feel in love with the power of transformation...  to take something tossed aside, unused, unloved and recreate it was inspiring to me.  Perhaps it's my childhood as an air force brat that motivates a need for change or a love of things I can't afford that drives to me to find a way to "copy" something for less.  Who knows?  Here you'll find some of my passions and projects - and maybe I'll even create some tutorials.